Recording
The plugin supports several recording methods. Choose the one that best fits your infrastructure — from a fully managed Google Cloud setup to YouTube streaming, Dropbox or externally-linked recordings.
Recording methods
GCP auto-managed with Jibri (recommended)
The most integrated recording option. When using a GCP auto-managed server (Type 3), the plugin automatically provisions a dedicated Jibri recording VM alongside the Jitsi server. Recordings are saved directly to Google Cloud Storage (GCS) and published automatically in the activity's Recordings tab — no YouTube account or manual intervention required.
This method also unlocks AI features (summary, quiz, transcription) powered by Google Vertex AI (Gemini). AI features are also available for JaaS (8x8) cloud recordings and Dropbox links — see AI features for the supported sources.
Simplest path to recording
To use this method, set up a GCP auto-managed server. Recording and AI features are enabled automatically once Jibri is provisioned.
YouTube Moodle-integrated
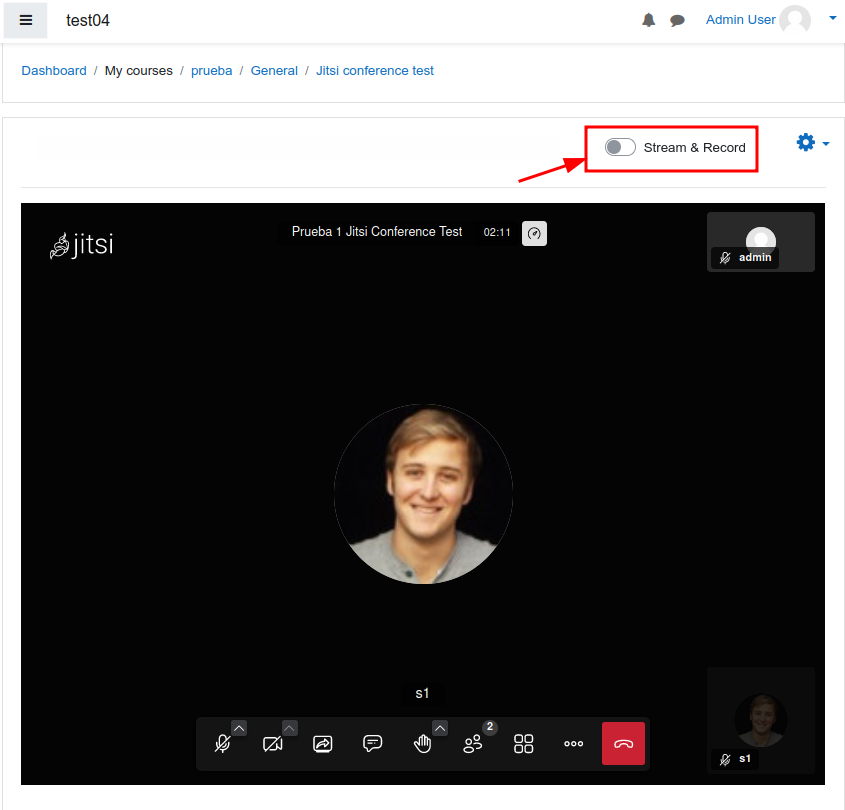
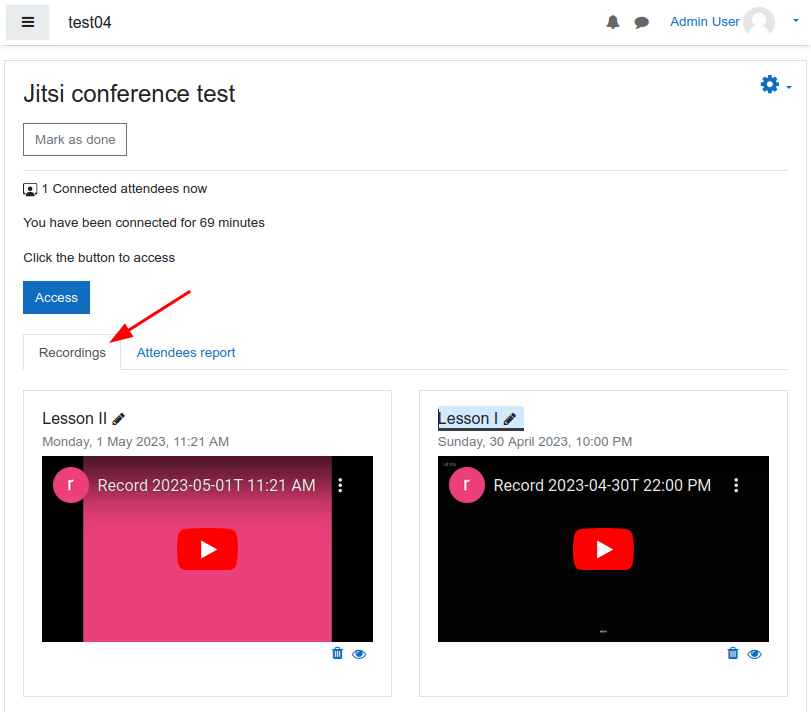
Configure the plugin to record sessions to corporate YouTube accounts. Teachers just need to click the Record and Streaming switch — recordings are automatically published as unlisted videos and embedded in the activity's Recordings tab. One Jitsi activity can have many recordings.
Recordings are stored as unlisted videos in YouTube. Teachers can hide or delete recordings from the activity; only administrators can permanently delete them from YouTube. A scheduled task handles automatic deletion based on a configurable retention period.
This method uses YouTube v3 APIs to:
- create live streaming sessions on the fly
- embed recordings inside Moodle
- delete recordings when no longer needed
Sharing of unlisted videos
Recordings remain unlisted on YouTube, but there is no way to prevent students from sharing the URL externally. Teachers should be aware of this.
Multiple YouTube accounts can be configured — only one is active at a time, but having extras available is useful if YouTube restricts a specific account.
Set up your OAuth 2.0 Client ID in Google Cloud
- Prepare one or more YouTube accounts with live streaming enabled (requires phone verification and a 24-hour wait).
- Create a project in Google Cloud Console and enable the YouTube Data API v3.
- Create OAuth 2.0 credentials for a Web application, adding the redirect URI shown in
the Jitsi plugin settings (e.g.
https://your_moodle_domain/mod/jitsi/auth.php). - In the OAuth consent screen, add the Google accounts associated with your YouTube channels as authorised users. Google calls these "Test users" — despite the name, this is the correct setup for production use when you only need a limited set of known accounts. You do not need to publish the app publicly.
- Copy the Client ID and Client Secret to the Jitsi plugin settings in Moodle.
- In Moodle, add and authorise your Streaming/Recording Accounts.
- Enable Live stream and select Moodle Integrated as the Live Streaming Method.
On app status and token expiry
Google's "Testing" status means only the accounts you explicitly added can authorise the app, and tokens expire every 7 days — requiring periodic re-authorisation in Moodle. To avoid token expiry, either publish the app (Google may require verification depending on scopes) or use the Google Workspace internal mode described below.
Google Workspace users
Set the User type in the OAuth consent screen to INTERNAL — no authorised users need to be added and tokens never expire. This is the recommended setup if your institution uses Google Workspace.
Never delete the OAuth credentials
Never delete the OAuth credentials in Google Cloud — doing so will remove all recordings from the associated YouTube accounts.
YouTube manual (teacher's own account)
Teachers can also stream using their own personal YouTube accounts by creating a "Go Live" stream and copying the stream key into the Jitsi interface. The recording link must then be published manually. This requires no plugin configuration, but each teacher needs their own YouTube account with live streaming enabled.
Dropbox and external recording links
In addition to YouTube streaming, the plugin supports publishing recordings stored in Dropbox or retrieved directly from the JaaS (8x8) cloud recording system.
How recording links are captured
When a session ends, the plugin listens to two Jitsi events:
recordingLinkAvailable— fired by Jitsi when a recording link is ready (Dropbox or other).recordingStatusChanged— fired when recording stops; may include a direct URL.
Links are saved automatically in the activity's Recordings tab. Duplicate links for the same session are ignored.
JaaS (8x8) cloud recordings
When using a JaaS server with cloud recording enabled, recordings appear automatically in the Recordings tab with a Download button. These links are hosted on 8x8's CDN and expire after 24 hours (or according to your JaaS plan). Once expired, they are automatically hidden from the tab — no manual cleanup is needed. While the link is valid, AI features (summary, quiz, transcription) can be generated from these recordings.
Recording button location (8x8)
The Recording button (8x8/JaaS) setting picks where teachers start a recording:
- Jitsi interface (default): Jitsi's native recording button stays inside the meeting. Its dialog lets the user choose between the 8x8 recording service and their own Dropbox.
- Moodle integrated: the native button is removed and a one-click Record button appears in the Moodle toolbar above the meeting (same UX as GCP servers). It always records to the 8x8 recording service and the link is saved in the activity automatically. If the Dropbox app credentials are configured, a separate Dropbox button is also shown: it runs the Dropbox OAuth flow in a popup and records straight to the teacher's Dropbox (that recording must then be published manually, see below).
Dropbox recordings
If Dropbox is configured in the plugin settings (App Key and Redirect URI), teachers can record sessions directly to their Dropbox account. Once the recording is saved to Dropbox, the teacher must manually publish the link to students:
- After the session, the teacher gets the share link from their Dropbox account.
- In the activity's Recordings tab, the teacher pastes the link using the "Add recording link" form.
Why Dropbox links can't be captured automatically
When using Dropbox recording, Jitsi fires recordingStatusChanged when the recording
stops, but the Dropbox URL is not included — it is generated asynchronously by Dropbox
after the upload completes. This is why Dropbox links cannot be captured automatically
and must be published manually.
Dropbox configuration
Navigate to Site administration > Plugins > Activity modules > Jitsi and fill in the Dropbox recording configuration section:
| Setting | Description |
|---|---|
| Dropbox App Key | The App Key from your Dropbox app (Dropbox Developer Console → your app → Settings tab). |
| Dropbox Redirect URI | The OAuth2 redirect URI registered in your Dropbox app. Must match exactly what you set in the Dropbox App Console — usually https://your-jitsi-domain/static/oauth.html. |
You need to create a Dropbox app at the Dropbox App Console.
8x8 servers: Record to Dropbox button
To use the Record to Dropbox button in the Moodle toolbar (recording button setting
"Moodle integrated"), register this additional redirect URI in your Dropbox app:
https://your-moodle/mod/jitsi/dropboxoauth.php. The token obtained in the popup lives
only in the browser session; it is never stored server-side.
Embedding Dropbox videos
When adding a Dropbox link manually, teachers can choose to embed the video directly in
the Recordings tab by checking the "Embed video (Dropbox)" option. The plugin transforms the
Dropbox share URL to a direct streaming URL (?raw=1) and renders it with an HTML5 <video>
player. A fallback "Open recording" link is always shown below the player.
Dropbox bandwidth limit
Dropbox has a monthly bandwidth limit on free accounts. If many students view the embedded video simultaneously, Dropbox may temporarily block direct access.
Managing recording links
Teachers with the Record session (mod/jitsi:record) capability can:
- Add external recording links manually via the form at the bottom of the Recordings tab.
- Edit any manually-added link (URL, name, embed option) using the edit icon next to the recording.
- Hide/show recordings from students.
- Delete recordings from the activity (external links are only removed from Moodle; the actual file in Dropbox or 8x8 is not affected).
The Recordings tab is always visible to teachers even when no recordings exist yet, so they can add links at any time.
Recording link expiry
The timeexpires field in the database controls when a recording link is automatically
hidden:
| Source | Expiry |
|---|---|
| JaaS (8x8.vc) | 24 hours from creation (or TTL from event if available) |
| Dropbox | Never (permanent) |
| YouTube | Never (managed via YouTube API) |
| Manual entry | Never (permanent) |
Expired recordings are hidden from the tab but not deleted from the database. They can be deleted manually from the Recordings tab.